Imagine you are walking on a dark road, and the only light source is your Flashlight. Suddenly it starts flickering and the vision in front of you is not very clear.
Let’s assume another incident like you have a sudden power cut in your house in the middle of a night.
Again, the only light source is your flashlight. You intend to see what’s wrong and all of a sudden, it starts flickering.
These incidents are widespread and often happen with flashlight users and believe me, it is not only irritating but also much frightening for people who are afraid of the dark.
Now, here in this article, we will provide you with some easy and effective steps.
Following these steps, you will be able to not only determine the problem but also fix these flickering problems as well.
Reading through the steps, will not take much of your time. You will see visible results, as you follow them as they are.
However many of the issues that we see have a rather simple solution to them. The flashing of lights is a common problem.
However, the cause may be difficult to detect and may range from a loose bulb to faulty wiring.
If your lights are flickering, first check if your bulbs are loose and tighten them to see if that solves the problem.
It could be aggravating to send your flashlight in for repairs and to have to wait for its return.
Identify why your lights don’t work as they should, and in no time you will return to full brightness.
How to fix a flickering flashlight problem [Step by Step]
If the lights flicker at your house and are not Faux flames bulbs or Christmas tree lights, you will have your annoyance, more perhaps a little nervousness.
To save you from this occurred situation we have arranged 6 individual step solution. Which will help you with your flashlight flickering problem.
If your flashlight flickers, the dirt might get in the way of the electrical current.
You want to make sure that your flashlight is clean of grime, particularly inside your body, head, and tail.
Be sure you don’t use too much alcohol because it will harm the interior of the flashlight. Just like this, there could be more problems causing flickering in your flashlight.
We will present them with a proper solution, and be sure this will be real quick and beneficial. Let’s get started;
1. Check and tighten bulb:
This may sound like an easy idea, but it’s not necessarily the first thing that comes to mind.
If your flashlight is flickering, turn off the power and use gloves to shield your hand from heat, screw the lamp tighter.
Loose light bulbs mean that the plug does not make good contact with the lamp, which can cause occasional flickering.
Even the recessed lights can loosen, so check the connections first.
2. Check for loose wiring:
The loose wire is one of the main triggers of a defective flashlight and something you can certainly not overlook.
If you’ve used a variety of different approaches to fix flickering and it’s always a matter of question, take a look at the flashlight wiring.
Most flickering is caused by a flawed or incompatible switch or a loose lamp or of low quality.
There’s a fair possibility that the lighting problems are a fast remedy, such as removing a dimmer or changing out a flashlight bulb.
You may read also how to remove stuck light
3. Check for worn-out batteries:
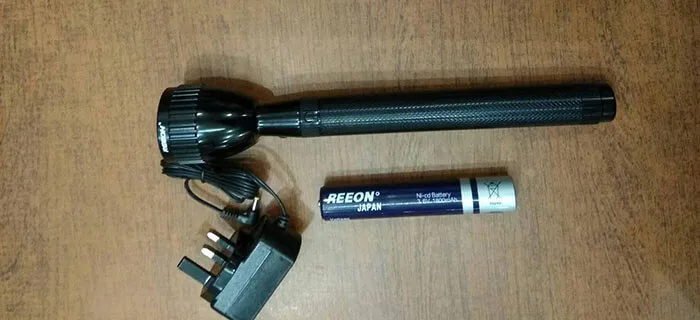
It’s always better to start first with the simplest battery solution. So this might be the batteries if your flashlight gets dim or soft or simply doesn’t go on at night.
To verify that it still has a charge, check the battery in the torchlight.
Maybe you only need to replace the battery or charge it. If there is a charge, the batteries should be carefully inspected for any leaks.
When they leak, ensure that they are disposed of correctly and replace them with new brand-span batteries.
4. Check for dirt-insulated connection:
The maintenance routine is very important, particularly when using your torchlight on outdoor excursions.
If you flicker your flashlight, the dirt can get in the way of an electric current.
You want to make sure your lamp is free of grime, in particular in the body, head, and tail. Clean each piece carefully take out the flashlight and inspect it.
Take a squeeze with a little alcohol and clean each piece carefully.
Don’t use too much-rubbing alcohol, as the interior of the flashlight can be harmful. But it’s pretty hard to use too much with a q-tip.
5. Check for Faulty Switch:
You can diagnose your switch in case your light is clean and has new batteries but it doesn’t work yet.
Remove the tail cap to make sure that the batteries are fully mounted.
Next, position a metal tool like a tweezer or screwdriver across the tail so that both the torchlight and the battery are in contact.
You know the trouble is with the switch if the light comes on. The trouble with the LED or the circuit around it when it does not turn on.
If your switch is an issue, you should inspect the switch assembly more closely. Check the switch to make sure nothing is loose inside.
Using a method to twist the retention ring in the anti-clock direction if it feels loose. This means that all is in a place closely.
Link the tail cap again to see if the turn tightened fixed the issue.
6. Check for O-rings number, position and situation:
If there are two or three o-rings in the head or tail, a lot of flashlights won’t turn in. To be sure, only one o-ring is at the front and one o-ring is on the tail.
If more than one is there, cut as many excess spots as you have and tighten your tail and head, and see if the issue is fixed.
The o-ring will also trigger more problems if your tactical ring is in place. Before the o-ring, the tactical ring should be mounted.
That is to add, the tactical ring should be closer than the ring to the head of the lamp. The tail cap cannot tighten the entire way while the O-ring is located before the tactical ring so the flashlight cannot turn on.
Conclusion
There you have it! I hope you do not get into the process of taking your flashlights in for maintenance with these few moves.
Above mentioned steps are mostly recommended by professionals and experienced users, who have faced this kind of problem. These steps are easy as well as beneficial.
However, if none of these steps works for you then make sure your flashlight is in top tip form using this warranty.